Ever since we first started to build structures and objects out of multiple pieces of wood, we have had to find innovative ways of binding the pieces together. Enter joinery – various joining methods that utilize shapes, wedges, and bindings to apply enough force/pressure to hold two or more different pieces of wood together. Skilled carpenters of old were able to craft beautiful structures and objects all by hand. Many of these carpenters were skilled enough to even be able to create works of art without the need for nails, wedges or bindings. Sadly this is a skill that has been lost to time, thanks to our reliance on modern tools and machinery and less on an individual’s skill.
As we entered the industrial age, we transitioned away from hand crafted carpentry, to more mass produced machine based manufacturing. While this means that we may have lost many of the skills of old, it does make it easier to identify the potential era a piece of carpentry was made in. Simply by looking at the quality of the cuts and the techniques used to assemble the piece, to the style of joinery and the materials used to hold parts together. We are able narrow down the time period for most antique wooden furniture, structures, equipment, and sculptures. It also allows use to determine what, if any repairs may have be been performed during the restoration process.
Contents
Determining the Region and Era
Just as with art styles, culture and fashion, each region of the world had their own joinery styles. Asian countries like China and Japan would often use such intricate designs that trying to assemble them yourself today, would be like trying to assemble one of these 3D puzzle toys. Other regions opted for brute force over fiddly designs, and would use a mallet to drive the pieces together or wedges and pins into place. Both variations while vastly different from one another, still followed the same principles, in that they would join the timbers in such a way that they couldn’t be pulled apart.
Even today, many of these joints are still in use and have remained popular among many cabinetmakers, builders, and carpenters. The techniques used for making many of these joints have not changed that much, aside for the tools that the craftsmen use. Handmade joints that were made before the mid 1800’s, were created using hand saws and chisels. This left the joints with rough uneven areas and their sizes would vary, sometimes even on the project. Joints made after the mid 1800’s, are more likely to have been produced using power tools and machinery to shape the timbers. These joints are more looking to be clean cut and even, with a smoother finish.
Have a look at the cut lines on the joints, and feel around for gouges and rough finishes. If the area is cleanly and evenly cut, with a smooth finish that doesn’t have any cutting or measuring guides gouged into the surface, then it would more then likely be a factory produced product and not something that was handmade. Do your research into the region and era , of a piece you are considering to acquirer. Look for the sort of materials that were available in the region and styles that was popular at the time. If the style and materials match the period, but there are joints that are from later periods. This could mean that there have been repairs made, or components have been replaced.
The Different Joinery Types
Depending on where the joint is located and what function it serves, can change the joints appearance. So to help give you a better understanding of what you need to be looking when identifying a hand crafted piece from a machined piece. We will be going over some of the ways hand made and machined would make joints by hand and the machined variety.
Mortise and Tenon Joint
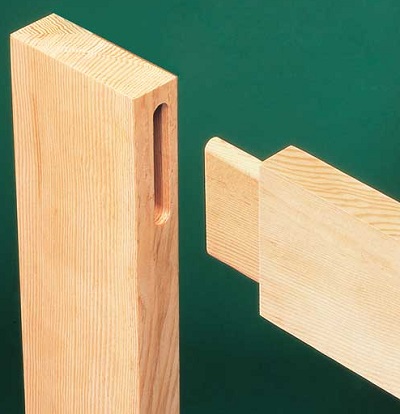
One of the strongest and oldest forms of joinery that has been used by carpenters for thousands of years. While it is a simple design, the mortise and tenon joint is nonetheless an effective and versatile joint that can be found in most carpentry, from furniture and storage, to buildings and bridges. Most quality antique furniture has been made using the mortise and tenon joint, in one variation or another.
Carpenters use the mortise and tenon joint technique to make a male and female connection between two pieces of timber. Called the “Tenon”, carpenters shape one end of the timber into a square tongue by reducing the thickness of the wood. On the other piece of timber, a slot known as the “Mortise” is made to match the measurements of the tenon. How closely the sizes match between the two determines how snugly the two parts fit. Some cultures may soak the tenon in a resin or glue prior to forcing the swollen wood into the slot. Others may not have used glues at all and required the fit to be as tight as possible. Then again nails, pegs or wedges may have been forced into the slot alongside the tenon, or driven through the side of the timber locking the tenon in place.
Check the fastening method used to help determine the region and era that the piece may be from. The following are the methods that carpenters use to make this joints:
Hand made Joints – Some carpenters still use this method, but prior to the mid 1800’s, this was the only way to make them.
- Carpenters would mark the length of the tenon by gouging the timber with a scribe.
- Using hand saws. The section of wood that is to be removed, is repeatably cut into widthwise ribs up the length of the tenon.
- The cuts only go as deep as needed to remove the excess wood. This can be done on either both sides of the timber, or just the one.
- Using a hand chisel and a mallet. The carpenter removes the excess wood buy breaking away the wooden ribs.
- The remaining wood is smoothed out and if needed more timber is shaved off.
The scribe, saw and chisel may leave behind marks and nicks in the timber. The cut line left behind by the saw may not be very clean, straight, or squared.
- Using a scribe, carpenters can gouge out the outline of the mortise’s opening.
- Prior to being able to drill holes into the timber, carpenters would chisel out the entire slot by hand.
- With the use of drill bits, hand cranked or powered, the carpenter could remove the excess wood from the timber, simply by repeatably drilling into the marked out section for the mortise.
- Either way, a chisel will then be used to remove the remaining wood.
This may also leave behind marks caused by the scribe, or the chisel or drill bits may have left an uneven opening to the mortise.
Machined Mortise and Tenon Joints – Following the mid 1800’s, carpenters were able to use hand tools that stripped or tore away the excess wood. This made even hand crafted pieces much easier to produce, and allowed production to go from single digits a day to double digits. With the implementation of machinery, factories were able to produce thousands of parts a day, all the same size and quality.
- Carpenters no longer need to mark measurements on the timber.
- By using a jig, tools like a router could easily be used to quickly and cleanly remove the excess wood. Making multiple tenons in the same time that it would take to make one by hand.
- These tenon would most likely have clean cut lines and a smooth finish to the face of the tenon.
- Machinery would be set to cut the tenons at all the same length and thickness.
- Carpenters could use a drill press to start removing the excess wood out of the mortise slot.
- A drill press will be unlikely to have have the drill bit go off center.
- Chisels were still used to remover the remaining wood by hand.
- As machinery improved, the mortise could now be fully removed without a carpenter having to pick up a chisel.
A skilled carpenter using machine tools to cut the tenons may not leave any marks on the timber. They may also be able to get a very close fit, so there may not be any noticeable spacing where the timbers butt up.
If the tenon was produced with a factory machine, there may not be any marks at all. The tenon and mortise were produced independently of each other. Which means that if the tenon was longer then the depth of the mortise, there may be a space between the edge of the tenon and the timber. If a mortise was made wider then the tenon, the tenon would have a looser fit. Unfortunately, not all factories have been known to follow strict QA inspections.
Butt Joint and Dowel Joint
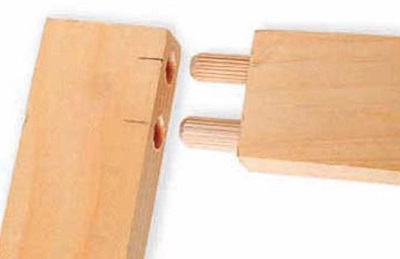
There’s not much to these joints really. It’s basically just two pieces of timber that have been pressed end to end, or end to edge. Both versions would use a gluing agent to help bind the pieces together, but it’s not a very strong technique and many butt joints have simple broken apart from nothing more then the passage of time.
This is where dowel comes in. Not everyone had access to nails, so carpenters would use pieces of dowel to reinforce a butt joint. By driving dowel into both ends of the timbers, thought still weak, carpenters were able to create makeshift nails.
- A blind dowel joint, is when holes are drilled only part way into the inside edge of the timber. Preventing it from being seen from the outside.
- Another method was to butt the timber together and drill holes right through. A carpenter would then drive the dowel into the hole with a mallet and cut the excess dowel off using a saw or pincers.
Blind dowel are hard to distinguish from a basic butt joint. It would be best to inspect the rest of the timber for markings that could indicate hole alignments and the use of hand tools, when trying to work out the age of a piece of carpentry.
If the dowel is visible from the outside. To see if the dowel was driven into the wood, look for impact marks left behind by a mallet, as well as if the dowel is sitting bellow the surface. Scratch marks caused by the saw cutting the excess dowel off, may have been left behind. Or if the ends of the dowel have been left broken or squeezed shut, after pincers broke off the excess dowel.
Lap Joint
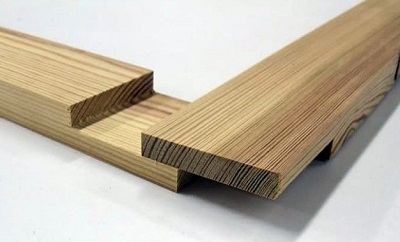
One of the most basic and functional carpentry joints. The lap joint is where two overlapping pieces of timber meet. Mostly seen with right angles. These joints can be used to extend the length of timber, secure an anchoring point, or even create a cross brace. If only one piece of timber has been notched out to fit the other piece flush, this is called a full-lap joint. When two pieces of timber have both been notched out to form an interlocking section, this is known as a half-lap joint.
This is important to know, as the lap joints can be used almost anywhere, where two pieces of timber can cross each other. So a single product could contain both the full and half lap joints alongside other joints as well. When checking to ensure that you are looking at an original piece, these terms are important.
For example – The seat of a chair with four 2″ square topped legs has the following joints, a full length full-lap joint brace across the front. Both sides of the chair have a double ended mortise and tenon joint brace between the legs, and the rear brace would be a 3/4 length half-lap joint. This makes all parts of the chair seat sit flush at the top of the legs.
This may sound a little confusing at first but once you get use to what joinery looks like, you’ll be able to see the pieces fitting together. Try to imagine the following:
- The braces on the sides were made to slot directly into the side of the legs.
- The front of the seat had a solid piece of timber that was the full width of the frame, and set flush into the front legs, being visible across the face of both legs.
- The rear of the seat had a piece of timber that was 3/4 the width of the frame, thinned down at both ends and was set flush into the legs, visible only partway across the face of the rear legs.
To determine if a lap joint was made by hand, or if a machine was used. Look for signs of uneven cutting, and guide lines that may have been made by a scribe. A machine made lap joint will most likely have clean cuts and guide marks may not have been used.
Dovetail
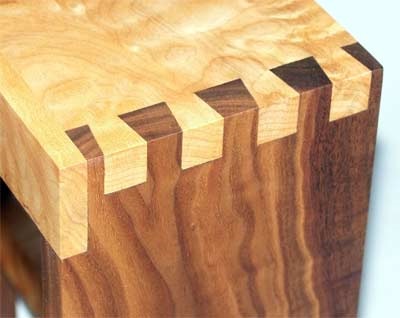
The late 1600’s to the very early 1700’s, introduced a difficult to make joint into furniture making. Drawers that were made before this time were more of an inconvenience with an extremely limited use, as they would break rather easily. Instead of drawers, carpenters made coffers – simple boxes that were designed to fit into the space provided.
By cutting out dove tail shapes at the end of the timber, and matching them up with dove tail shapes that have been cut into the end of another piece of timber, like a puzzle piece. Allows carpenters to make strong and durable drawers that won’t pull apart when the drawer is being opened.
Dovetail joints were difficult to make by hand and required a lot of skill to master. Despite its effectiveness it is for this reason that dovetail joints were relatively rare and reserved mostly for high end products.
Hand Made Joints – Capable carpenters would use fine-toothed saws and chisels to cut out the dove tail shapes that give the joint its name.
- Look for uneven spacing between the dovetails.
- There may be varying sizes, shapes and lengths for the dovetails.
- The pairing dovetail shapes or alignment for the two pieces of timber may not be perfect.
- Look for timbers that do not sit flush and even.
- Looking at the edges of the pairing dovetails. Look for mismatching sizes and shapes.
The 1900’s brought in the development of machines and routers that could simulate handmade dovetails. These joints will have evenly spaced dovetails, that are all the same length, shape and size, as each other. The pairing dovetails will have clean edges and fit almost perfectly with each other.
Knapp Joint
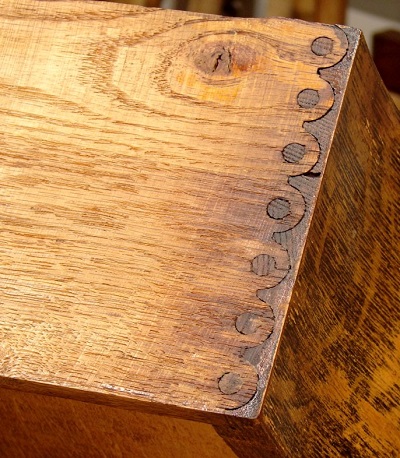
Going by other names such as the scallop and dowel, pin and scallop, and the half moon joint. This type of joint was developed by a Mr Charles Knapp of Waterloo Wisconsin, during the 1860’s. Mr Knapp would later patent his design in 1867, leading the way for factories to start mass producing drawers using his machinery. Drawers made between the 1860’s and the early 1900’s may use the Knapp joint instead of the dovetail joint. During the 1900’s however, nostalgia drew people back to the handmade styles of old, and the Knapp joint lost out to the dovetail joints in popularity.
In Conclusion
We hope this article has helped you to narrow down the potential era a piece was produced in. Do your research into the sort of joints a piece is meant to have, and look for the signs of handmade craftsmanship or machine produced fabrication.
have a 1920’s era lane cedar chest , the joinery is nothing i haver seen before . like a knapp joint but the joint is like a ball &butt joint routered in .